How To Develop Excellent Rhythm


This page contains resources to help you develop a range of rhythm skills. Use the audios on this page if you have recently starting working on your strumming, or if you want rhythm tracks to help you build consistency with single note playing, scales and arpeggios. Scroll down to find them straight away, or read on for a recap and tips on how to use them.

The most important thing you need to bear in mind when it comes to building up your strumming skills and your range of strumming patterns is that your arm is going down on each beat/count and coming up in between. In a bar of four, that means you have four downstrokes and four upstrokes = eight possible places in each bar of four where you can make contact with the strings. The consistency of your rhythm comes from your arm moving regularly and articulating the rhythm as a result of which downs and ups you hit, always in the same place in each bar.

Quick recap for note values – a whole note lasts for four beats or one whole bar. This would be, for example, if you strummed a chord and it rang out for the whole bar. It looks like this:

A half note lasts for two beats or half a bar. Two half notes look like this:

A quarter note lasts for one beat or one quarter of a bar. Four quarter notes look like this:

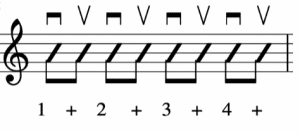
An eighth note lasts for half a beat. Eight eighth notes look like this. This bar describes hitting every single down and every single upstroke for a count of four.

Familiarise yourself with the terms given to the different note values. If any rhythm is referred to as an eighth note rhythm, it doesn’t mean that it consists of all eighth notes (that would become irritatingly insistent after a while). It means that the maximum subdivision of each beat is into two in that particular melody or strumming pattern. If you have a count of four beats, and each beat can divide into two, that gives you a maximum of eight eighth notes in each bar.

Later on you’ll see that it is possible to subdivide a beat into three and four equal parts as well as into two, and those rhythms have different names.

The best way to get good enough at strumming to add vocals on top or play songs so that they are recognisable is to practice with rhythm backing tracks. These train you to move your arm consistently and develop your internal sense of rhythm. If you do this, even if you have no natural rhythm whatsoever at the start, you will develop good rhythm and your playing will sound musical. Having good rhythm is a far bigger and more significant part of what makes any piece or song sound recognisable and musical than any of the other elements – we respond extremely strongly to rhythm, and other types of errors are less significant in the ears of the listener than rhythmical ones. It’s important to know that we need to train both our ability to hear rhythm, and our physical ability to synchronise our movement with rhythm. It’s very common to build up your rhythmic understand so that you know when you want to make the sound, but to be let down by your right arm just not being synchronised up to move when you want it to. Practicing this way eliminates that problem. There is a list of steps here, you don’t need to do all the steps at once! If you are starting out on guitar, doing step 1 for four minutes with one of the tracks is plenty. The next day, you might repeat step 1 with a faster tempo, or you might move on to step two. You might not be adding chords for a month or two – that doesn’t matter.

STEP 1 – Beginning guitarist – Get used to finding the pulse, the place where you would tap your foot, with each of the rhythm tracks below. Without any chord at all, mute the strings and move your arm in time so that you make a rhythm hitting the strings with downstrokes. Doing this at increasing speeds builds your coordination. This is great at any level and in your first month of playing this is an especially valuable activity.

STEP 2 – Beginning guitarist – Take your rhythm training pack and strum through one rhythm at time. Start so it’s totally manageable and go as fast as is comfortable. Playing consistently at 60pm is better than not being too sure and stopping and starting with your arm at a faster tempo.

STEP 3 – Beginning guitarist – when you can play the rhythms fluently, challenge yourself to read down the page instead of across so that each bar is a different rhythm.

STEP 4.  Beginning guitarist on a chord change that is mastered: Now add chords. You can take one of the Core Chord Progressions, or a Blues progression, or any pair of chords. Only do this step when you can change chords comfortably at the speed you’re working on.

STEP 5 – Beginning guitarist – Write down your own rhythm based on the training sheet you’ve been using. Play it, with or without chords.

STEP 6 – Late beginning/improving guitarist – if you want to challenge yourself more, write more than one bar of rhythm, and play a different chord on each bar.

To use the training audios, click on the orange text for the speed you want and it will open in a separate window.

60bpm

70 bpm

80bpm

90bpm

100bpm

110bpm

120bpm