One of the wonderful attributes of the guitar is that it is very effective as an instrument to provide accompaniment and an instrument to play melodies. You can play short melodies, longer tunes, riffs, alternate between melodies and accompaniments and even do both at the same time. You don’t need a lot of vocabulary to be able to play great improvisations. The material in this topic will develop your technique, open up the fretboard and furnish you with some very useful vocabulary for improvisation. The major pentatonic can often be combined very well with the minor pentatonic in blues and rock styles of improvisation.
Our material today is the major pentatonic scale. This scale is used in many iconic songs, riffs, melodies. It offers us some great options for pieces of music, for improvisation, chord fills and for developing expressive skills on guitar.
If you have seen The Sound Of Music, you will remember the Do Re Mi Fa So La Ti Do song. You may know that those seven notes form the major scale, which is one of the cornerstones of the Western music tradition both traditional and contemporary.
The major pentatonic is a five note scale derived from this that drops two of the notes. The notes remaining are 1 2 3 5 6. The numbers describe the distance relationship of the five notes.

If you imagine the fretboard, the notes 1 2 3 4 5 6 spaced along a single string would be spaced as above.
Wherever 1 is, the sound will be consistent providing the spacing of the notes is the same. 1 is our root note. If we start with 1 on C, it’s a C major pentatonic. If we start with 1 on G, it’s a G major pentatonic, etc.
Don’t worry if you don’t fully understand this yet. You can still use this material effectively.
We will start with playing the G major pentatonic using a pattern across two strings.
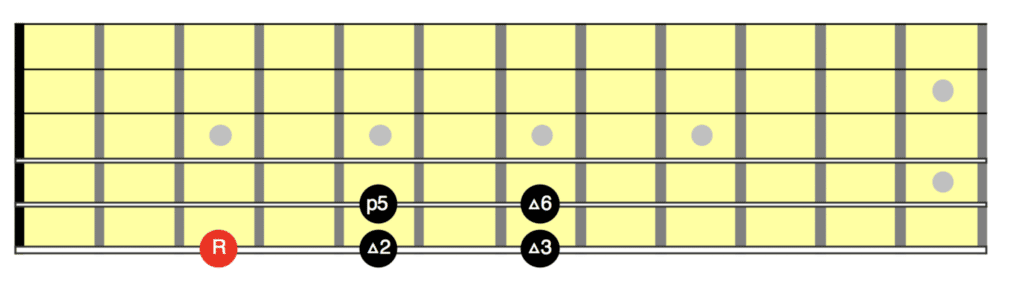
Play the tab that follows, which uses the notes indicated in the neck diagram above.
1. G major pentatonic on strings 6/5

A big part of the typical guitar sound is obtained by using expressions. This means slides, hammer ons and pull offs. The next few examples show these same notes played with different combinations of slides, hammer ons and pull offs. You will need to modify your fingering (using fingers 1 and 3 on LH) depending on whether you are doing a hammer on first (hammer on finger 3) or a slide (slide using finger 1).
If you don’t get much sound to begin with, keep at it. It takes some time to build the coordination and strength needed but once you can do it, it will feel easy. The notation for a slide is a diagonal line. The notation for hammer ons and pull offs is a curved line. A hammer on will have a higher fret number second. If you see 3 with a hammer on to 5, you pick the note at fret 3, and then hammer your finger down on to fret 5 without picking a second time. The sound comes from your finger coming onto the 5th fret.
A pull off has a higher fret number first. With a pull off you need both fingers in place – so pulling off from 5 to 3 would require you to have fingers 1 and 3 in place already on frets 3 and 5. You pick the first note, and pull the nub of the finger down and off the fretboard – this sets the string in motion and we hear the second note.
A slide is when you pick the first note, keep the finger on the string and quickly slide to the next note, without picking again. You can do this in either direction.
Play each of these following variations 10 – 20 times each and your hands will get more control over a short period of days.
Check your position – it’s easier to get the right movements to sound the notes using these phrasing techniques when the neck is at 45 degrees and your thumb is behind the neck.
2. Hammer-on followed by slide

3. Slide followed by hammer-on

4. Slide, hammer-on, slide

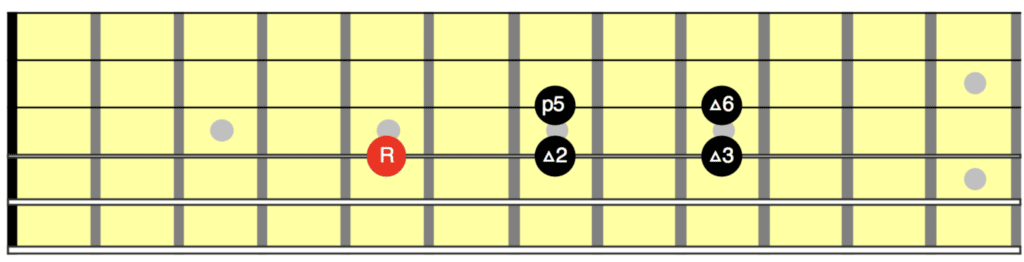
Oh look! The exact same pattern works if you start from G at the 5th fret on the D string! Guitar is such a great and convenient instrument!
Repeat the four variations we saw for strings 5/6 on strings 4/3
Now repeat the same four variations on strings 1/2
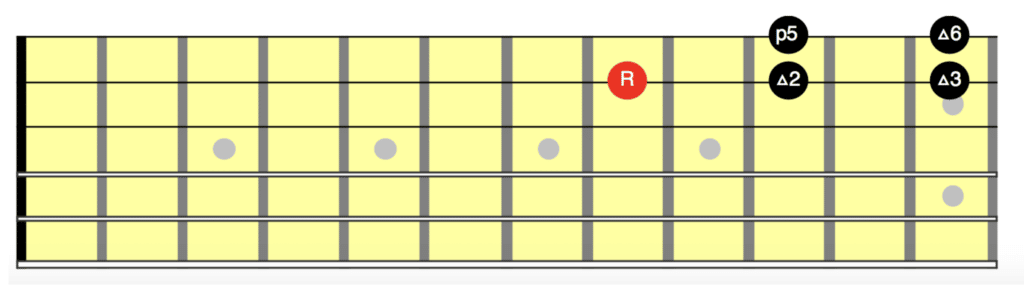
And now we can traverse the whole fretboard using this pattern. The important thing to recognise is that it is one pattern that repeats. What a time-saver!

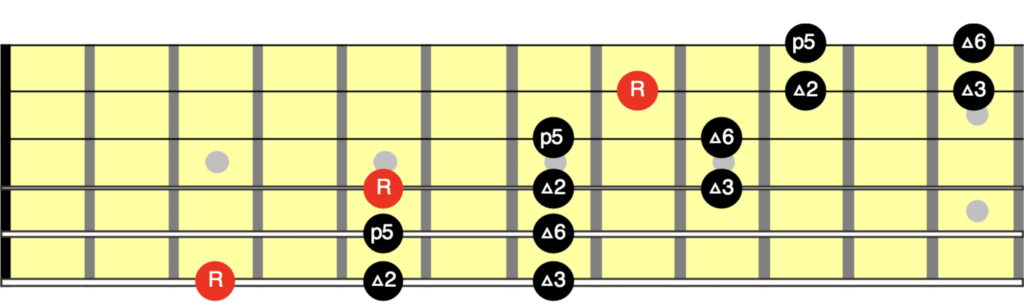
If you are relatively comfortable with the pattern as a whole, the next step is to start getting into the detail of which note is which inside it. In each position / string pair, play the notes the following ways. Pay attention to how each combination sounds and feels:
Play from the root note all the way up, and end on the root.
Play from the root note all the way up, and end on the 2nd note marked 2. Play from the root note all the way up, and end on the 3rd note marked 3.
Play from the root note all the way up and end on the 5th, marked 5 (nb: all these numbers represent a measurement of musical distance, not necessarily what order they come in the series).
Now start on the last note, play down and end on each note in turn: the 6th which you start on, then the 5th, 3rd, 2nd, and root.
You may notice that ending on different notes in the series gives your ear a different sense of resolution and closure.
Your first objective is to memorise the pattern and be able to play it up and down with expressions.
It becomes much more valuable to you when you start familiarising yourself with where the different notes are within it, and when you’re able to move it into different keys. Where would you play it for the keys of F, A, C and D? Can you play the minor pentatonic string pair for a key followed by the major? How do thing that sounds?
You can use these backing tracks for improvisation. Any track in the key of G major will also work.
